最近發現 Udacity 的免費課程還滿有趣的,雖然入門的課程真的很入門,但是教學方式滿可愛的。
接下來的文章多多少少會參考 Udacity 的內容。
今天我會透過製作猜數字遊戲,來概略介紹 Android 開發的流程。
開發流程
如果有用 Vue.js 之類的框架開發過網站,應該能很快想像出開發 Android App 的流程。
我們在開發網站時,會在 HTML 裡面寫好介面的骨架,接著把 CSS 樣式套進去,然後用 JavaScript 寫程式邏輯;而在 Vue.js 等框架中,又能將一些元素切割成所需的元件,並將資料與介面綁定在一起。
Android 專案則是以 XML 撰寫介面的佈局檔案(也可以用圖形介面的編輯器),並利用字串、樣式等檔案套入所需的內容與樣式,再在 Java 中指定要使用的介面與邏輯,並打包成 .apk 。
專案架構
Android 專案中的檔案可以簡單分成程式邏輯和資源,資源包含圖檔、音樂、佈局、樣式等。
開發者可以依據組態設定,針對使用者當前的環境選擇適當的資源。這樣的好處就是能夠適應各種不同的裝置和 API 版本,也能製作多語系的內容;另一方面也比較容易協作,並增進開發效率。
以猜數字遊戲來說,視覺設計的內容如下:
- 可以輸入四位數字
- 可以看到歷史紀錄,包含幾 A 幾 B
- 有送出和開新遊戲的選項
程式邏輯則是:
- 每局隨機產生一組四位數字
- 送出時會比對答案並回傳幾 A 幾 B
- 把歷史紀錄放進畫面中
會更動到的檔案有這些:
1
2
3
4
5
6
7
8
9
10
11
| app
├── java
| └── [packageName]
| ├── MainActivity // 程式邏輯
| └── Game // 遊戲邏輯
└── res
├── layout
| └── activity_main.xml // 介面佈局
└── values
├── colors.xml // 顏色資源
└── strings.xml // 字串資源
|
實作
Game.java
在一切開始之前,我們先把猜數字的遊戲邏輯準備好。
1
2
3
4
5
6
7
8
9
10
11
12
13
14
15
16
17
18
19
20
21
22
23
24
25
26
27
28
29
30
31
32
33
34
35
36
37
38
39
40
41
42
43
44
45
46
47
48
49
50
51
52
53
54
| class Game {
private String answer;
private boolean win = false;
String getAnswer() {
return answer;
}
boolean isWin() {
return win;
}
void generateAnswer(){
char[] list = {'0','1','2','3','4','5','6','7','8','9'};
String result = "";
for (int i=0;i<4;i++)
{
int index = new Random().nextInt(list.length);
result += list[index];
}
answer = result;
}
String checkAnswer(String guess){
int a = 0, b = 0;
boolean[] answerUsed = {false,false,false,false};
boolean[] guessUsed = {false,false,false,false};
for(int i = 0; i < 4; i++)
{
if(guess.charAt(i)==answer.charAt(i)) {
answerUsed[i]=true;
guessUsed[i]=true;
a++;
}
System.out.println();
}
for(int i = 0; i < 4; i++)
{
for(int j = 0; j < 4; j++) {
if (!guessUsed[i] && !answerUsed[j] && guess.charAt(i) == answer.charAt(j)) {
answerUsed[j] = true;
guessUsed[i] = true;
b++;
break;
}
}
}
String result = a + "A" + b + "B";
if(a==4)
{
win = true;
}
return result;
}
}
|
activity_main.xml
再來是畫面的部分。
Android 中的每一個頁面稱為 Activity , Activity 中有一組一組的元件稱為 ViewGroup ,而每個元件(例如輸入框、按鈕等)就稱為 View 。
activity_main.xml 是預設的進入頁面 ,而猜數字遊戲也只需要這一頁。
就像 HTML 一樣,我們可以先依照畫面中想要有的架構,安排標籤,代表特定的 View。
View 底下沒有更小的 View 時,可以用 self-closing tag (Android Studio 會提醒)。
就像下面這樣子:
1
2
3
4
5
6
7
8
9
10
11
12
13
14
15
16
17
18
19
20
21
22
23
24
25
26
| <?xml version="1.0" encoding="utf-8"?>
<androidx.constraintlayout.widget.ConstraintLayout>
<TextView/>
<EditText/>
<Button/>
<ScrollView>
<LinearLayout>
<TextView/>
<TextView/>
</LinearLayout>
</ScrollView>
<FrameLayout/>
<Button/>
</androidx.constraintlayout.widget.ConstraintLayout>
|
針對每個 View 要有怎樣的寬高、樣式都要寫在屬性中,所以會變成下面這個樣子。
其中寫到一些佈局的設定,這篇文章暫時不解釋。
1
2
3
4
5
6
7
8
9
10
11
12
13
14
15
16
17
18
19
20
21
22
23
24
25
26
27
28
29
30
31
32
33
34
35
36
37
38
39
40
41
42
43
44
45
46
47
48
49
50
51
52
53
54
55
56
57
58
59
60
61
62
63
64
65
66
67
68
69
70
71
72
73
74
75
76
77
78
79
80
81
82
83
84
85
86
87
88
89
90
91
92
93
94
95
96
97
98
99
100
101
102
103
104
105
106
107
108
109
110
| <?xml version="1.0" encoding="utf-8"?>
<androidx.constraintlayout.widget.ConstraintLayout xmlns:android="http://schemas.android.com/apk/res/android"
xmlns:app="http://schemas.android.com/apk/res-auto"
xmlns:tools="http://schemas.android.com/tools"
android:layout_width="match_parent"
android:layout_height="match_parent"
android:background="@color/colorPrimary"
tools:context=".MainActivity">
<TextView
android:id="@+id/title"
android:layout_width="wrap_content"
android:layout_height="wrap_content"
android:layout_marginTop="60dp"
android:text="@string/title"
android:textColor="@color/colorPrimaryDark"
android:textSize="36sp"
app:layout_constraintEnd_toEndOf="parent"
app:layout_constraintStart_toStartOf="parent"
app:layout_constraintTop_toTopOf="parent" />
<EditText
android:id="@+id/inputNumber"
android:layout_width="wrap_content"
android:layout_height="wrap_content"
android:layout_marginTop="40dp"
android:ems="10"
android:inputType="number"
android:maxLength="4"
android:textColor="@color/colorSecondary"
app:layout_constraintEnd_toEndOf="parent"
app:layout_constraintStart_toStartOf="parent"
app:layout_constraintTop_toBottomOf="@+id/title" />
<Button
android:id="@+id/submitButton"
android:layout_width="wrap_content"
android:layout_height="wrap_content"
android:layout_marginTop="40dp"
android:background="@color/colorAccent"
android:text="@string/submit"
android:textColor="@color/colorPrimaryDark"
app:layout_constraintEnd_toEndOf="parent"
app:layout_constraintStart_toStartOf="parent"
app:layout_constraintTop_toBottomOf="@+id/inputNumber" />
<ScrollView
android:id="@+id/scrollView2"
android:layout_width="300dp"
android:layout_height="390dp"
android:layout_marginTop="40dp"
android:background="@color/colorSecondary"
app:layout_constraintBottom_toBottomOf="parent"
app:layout_constraintEnd_toEndOf="parent"
app:layout_constraintStart_toStartOf="parent"
app:layout_constraintTop_toBottomOf="@+id/submitButton"
app:layout_constraintVertical_bias="0.0">
<LinearLayout
android:layout_width="match_parent"
android:layout_height="wrap_content"
android:orientation="horizontal">
<TextView
android:id="@+id/history_input"
android:layout_width="150dp"
android:layout_height="wrap_content"
android:padding="24dp"
android:textColor="@color/colorPrimaryDark"
android:textSize="24sp" />
<TextView
android:id="@+id/history_result"
android:layout_width="150dp"
android:layout_height="match_parent"
android:padding="24dp"
android:textColor="@color/colorPrimaryDark"
android:textSize="24sp"
android:textAlignment="viewEnd"
android:gravity="end" />
</LinearLayout>
</ScrollView>
<FrameLayout
android:id="@+id/cover"
android:layout_width="match_parent"
android:layout_height="match_parent"
tools:layout_editor_absoluteX="0dp"
tools:layout_editor_absoluteY="0dp"
android:background="@color/transparent"
android:visibility="invisible"
>
</FrameLayout>
<Button
android:id="@+id/restartButton"
android:layout_width="wrap_content"
android:layout_height="wrap_content"
android:background="@color/colorAccent"
android:text="@string/restart"
android:textColor="@color/colorPrimaryDark"
app:layout_constraintEnd_toEndOf="parent"
app:layout_constraintHorizontal_bias="1.0"
app:layout_constraintStart_toStartOf="parent"
tools:ignore="MissingConstraints"
tools:layout_editor_absoluteY="2dp" />
</androidx.constraintlayout.widget.ConstraintLayout>
|
一開始看到可能會覺得有點多有點亂,這邊來說明一下各個屬性的作用:
- android:id
- View 的 ID
- 值的格式是 @+id/{ ID }
- 在 Java 中會變成 R 類別的 member ,例如 R.id.submitButton
- android:layout_width 、 android:layout_height
- View 的寬高
- 值
- wrap_content :依內容的寬高而定
- match_parent :依父層的寬高而定
- dp 、 in 、 mm 、 px 、 sp :用 px 會被建議改成 dp
- android:padding 、 android:margin
- 就和 CSS 的 padding 、 margin 一樣
- android:ems
- android:inputType
- EditText 的內容類型
- 可以填的類型非常多種,例如 textEmailAddress 、 number等
- android:maxLength
- android:visibility
- 是否顯示 View ,類似 CSS 中的 display 或 opacity
- 值
- visible :預設值,可見
- invisible :不可見,但存在
- gone :不存在
- android:background
- View 的背景,可以是顏色或圖片
- 值:可以取用資源或直接寫色碼
- android:text
- View 的文字內容
- 值:可以取用字元或直接寫字串
- android:textColor
- View 的文字顏色
- 值:可以取用資源或直接寫色碼
Resource
看到上面的最後三點可能會覺得有點奇怪,取用資源是什麼意思呢?
Android 的裝置有各種廠牌、尺寸,加上不同語言的狀況,如果每一種都做一版可能要做到天荒地老;所以開發 Android App 基本上推薦用 congifuration 的方式,也就是用類似變數的方式,統一管理不同情境的資源(類似 Vue I18n 的概念)。
res 資料夾就是拿來存放這些資源,佈局(例如上面的 activity_main.xml )和一些數值都是屬於 Resource 。
以猜數字遊戲來說,就使用到 colors.xml 和 strings.xml 這些資源。
1
2
3
4
5
6
7
8
9
10
11
12
13
14
15
16
| // colors.xml
<resources>
<color name="colorPrimary">#9B7874</color>
<color name="colorPrimaryDark">#44090A</color>
<color name="colorSecondary">#F1DEDE</color>
<color name="colorAccent">#BBACC1</color>
<color name="transparent">#88000000</color>
</resources>
// strings.xml
<resources>
<string name="app_name">GuessNumber</string>
<string name="title">猜數字遊戲</string>
<string name="submit">送出</string>
<string name="restart">重新開始</string>
</resources>
|
在佈局中要使用到這些設定值,用 @string/restart 這樣的格式。
MainActivity.java
把資源都準備好後,就可以來寫程式邏輯了。
在這邊只需要知道:
- Android Studio 很貼心,引用函式庫會自動幫忙 import
- Activity 被創造出來之後發生的行為就寫在 onCreate() 中
- View 的類別名稱就跟它的標籤一樣
- 變數不能在 onCreate() 前賦值
- findViewById() 就類似 JavaScript 的 getElementById() ,不過參數要用 R 類別中的 id
剩下例如按鈕的點擊事件、如何更改 View 的屬性,都是需要的時候上網查就可以。
以下用註解說明程式邏輯。
1
2
3
4
5
6
7
8
9
10
11
12
13
14
15
16
17
18
19
20
21
22
23
24
25
26
27
28
29
30
31
32
33
34
35
36
37
38
39
40
41
42
43
44
45
46
47
48
49
50
51
52
53
54
55
56
57
58
59
60
61
62
63
64
65
66
67
68
69
70
71
72
73
74
75
76
77
78
79
80
81
82
83
84
85
86
87
88
89
90
91
92
93
94
| package tw.com.mydomain.guessnumber;
import android.annotation.SuppressLint;
import android.app.Activity;
import android.content.Context;
import android.os.Bundle;
import android.view.View;
import android.widget.Button;
import android.widget.EditText;
import android.widget.FrameLayout;
import android.widget.TextView;
import android.widget.Toast;
public class MainActivity extends Activity {
Button submitButton;
Button restartButton;
EditText inputNumber;
TextView historyInput;
TextView historyResult;
Toast toast;
FrameLayout cover;
int counter;
@Override
protected void onCreate(Bundle savedInstanceState) {
super.onCreate(savedInstanceState);
setContentView(R.layout.activity_main);
submitButton = (Button) findViewById(R.id.submitButton);
restartButton = (Button) findViewById(R.id.restartButton);
inputNumber = (EditText) findViewById(R.id.inputNumber);
historyInput = (TextView) findViewById(R.id.history_input);
historyResult = (TextView) findViewById(R.id.history_result);
cover = (FrameLayout) findViewById(R.id.cover);
counter = 0;
final Game game = new Game();
game.generateAnswer();
final Context that = this;
submitButton.setOnClickListener(new View.OnClickListener(){
@SuppressLint("SetTextI18n")
@Override
public void onClick(View v){
if(inputNumber.getText().length() == 4) {
historyInput.setText((inputNumber.getText() + "\n") + historyInput.getText());
historyResult.setText((game.checkAnswer(inputNumber.getText().toString()) + "\n") + historyResult.getText());
inputNumber.setText("");
if (game.isWin()) {
Toast.makeText(that, "You win", Toast.LENGTH_LONG).show();
inputNumber.setEnabled(false);
submitButton.setEnabled(false);
cover.setVisibility(View.VISIBLE);
}
}
}
});
restartButton.setOnClickListener(new View.OnClickListener(){
@Override
public void onClick(View v){
if(game.isWin())
{
Toast.makeText(that, ("Game restarted"), Toast.LENGTH_LONG).show();
}
else
{
Toast.makeText(that, ("Last answer: " + game.getAnswer()+"\n\n Game restarted"), Toast.LENGTH_LONG).show();
}
inputNumber.setEnabled(false);
inputNumber.setEnabled(true);
submitButton.setEnabled(true);
game.generateAnswer();
historyInput.setText("");
historyResult.setText("");
cover.setVisibility(View.INVISIBLE);
}
});
}
}
|
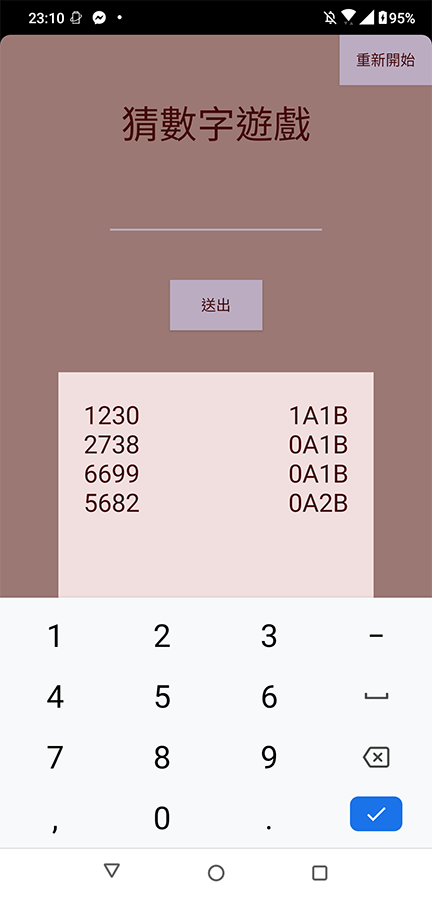
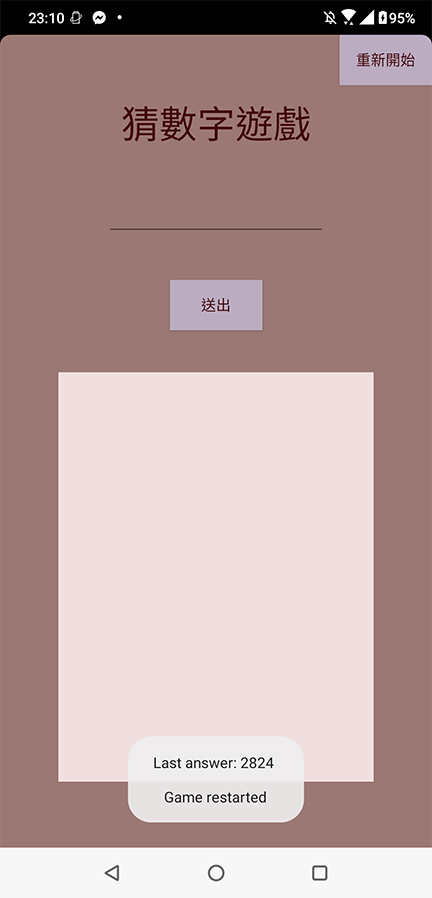
執行畫面
遊戲執行起來就像這個樣子: